Here are three leather sources that I know of, not including Tandy.
I'm also adding these to the Resources: Making Armour page.
Springfield Leather: Family owned and operated leather supply store located in the USA. They do carry sole leather, which is armour weight. They also sell tools, beads, hand-painted feathers, exotic leathers... Their catalog is pa ked full, and half an inch thick. I have ordered from them, and the customer service was excellent.
Brettun Leather: Leather supply store based in Maine. From their website : "We buy our leather and other products from leather goods manufacturers and tanneries throughout New England and around the world, and help them reduce excess inventory. We also help them avoid sending good leather to the landfill. The end result is that we are able to offer high quality leather and craft items to you at low prices." They also offer free shipping to the contiguous 48 states, and do their best to offer it to customers in Alaska, Hawaii, and the Territories.
They also sell supplies to restore and repair steamer trunks, and have information on restoring them as well.
Weaver Leather: Leather supply store based in Ohio. The heaviest leather I could find was 13-15oz saddle skirting.
Friday, January 24, 2020

Friday, August 30, 2019
Class Handouts
Below are the PDFs of handouts for my classes. I will be adding to this post as handouts are created. (Not all classes will have handouts).
Class Handouts
Leathercare 101: Basic leather care for armour, garb, and more. Cleaning, conditioning, and basic evaluation.Leathercare 102:
Problem Solving, Stitching Leather, and more.
Monday, August 19, 2019
A&S: Anglo-Saxon Seax Sheath
Anglo-Saxon Seax Sheath
Displayed at Ice Castles, Barony of Black Diamond, 19 Jan 2019

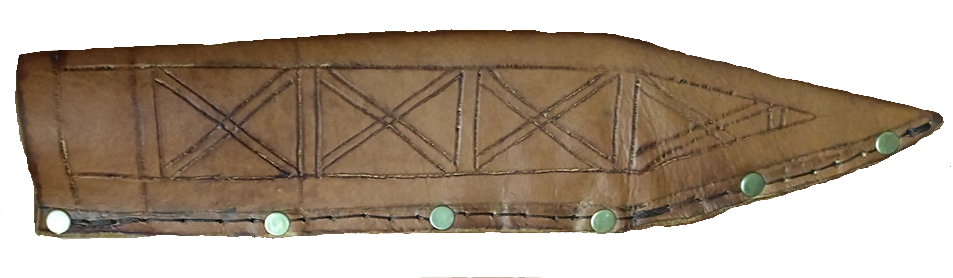
Project: Anglo-Saxon Seax Sheath
Artisan: Lady Þóra (Thóra) Hrafnsdóttir
Historical Basis:
Based on a Anglo-Saxon Seax Sheath found in Coppergate / York, England, dated to 900-1000 C.E.
Materials: leather, water, waxed linen thread, modern rivets, rubber cement
Techniques: water forming, tooling of wet leather, leather stitching.
Tools: Modern awl and stamping tool, water, rubber mallet, steel sewing needle.
Dimensions:
Seax: 14"L total; 9”Lx2”W blade, 4.75” handle
Sheath: 13.25” Long, 3m” Wide
This is a commission piece intended for regular, possibly heavy use. I chose sheath 15661 to use as my model. Some details have been modified to suit the user, while aiming to maintain a period appearance.
I used 7.5oz leather, which is the same 3mm thickness mentioned in the source material. The color was chosen to resemble leather aged with use, rather than dyed, and cut to the size of the seax it is for. It was then dampened and stretched around the seax, which I had already wrapped to protect it. Clamps held it in place after I worked with it and while the leather dried into the desired shape. The clamps left impressions on the damp leather, which I was able to work into the designs.
The designs are based heavily upon the model. The tooling design was not measured to match the original, but rather was sketched out on paper to reflect the original and yet remain roughly in scale with the new item. The design was then recreated on the dampened leather, with the sketch used as a guide. They were applied first with a dull awl, drawn along the leather with pressure applied to create a deep line. A dull awl was used in order to minimize cutting the surface of the leather. A smooth-surface tooling stamp was then used to deepen and darken the marking.
I have added a small piece of leather to the interior, at the tip of the sheath. The seax has an angled transition between the back section of the blade and the point that seems to be different from most of the period examples1 that I have seen. The additional leather has been cut to fill the space between the edge of the seax and the end of the sheath. It has been attached along the edge closure, as well as being glued to the sides with rubber cement. This was done to insure the blade could not slide past it on either side.
- Showing the angled transition between the back section of the blade and the point, and how it differs from the angle of the sheath. The unfilled area is where the additional leather was added.

- Silhouette of the find from Sittingbourne, Britain for comparison.

- And both, with the find overlaid in yellow against the seax and sheath. It illustrates the differences in blade angle nicely. (Not to scale)

Extant sheaths were closed with rivets, and sometimes also with tunnel stitch, which is beyond my current skill level. I have used rivets and saddle stitch, which is similar in appearance and technique to tunnel stitch. Both stitches are very durable.
The belt loops are at the length requested by the owner, and attached directly to the sheath with rivets and sewing. It is unclear if metal edgings were used on the original. I have chosen not to use them on this piece, as I do not have the supplies or skills available at this time.
Illustrations of source:
#15661, Group 1, Pg 3382:
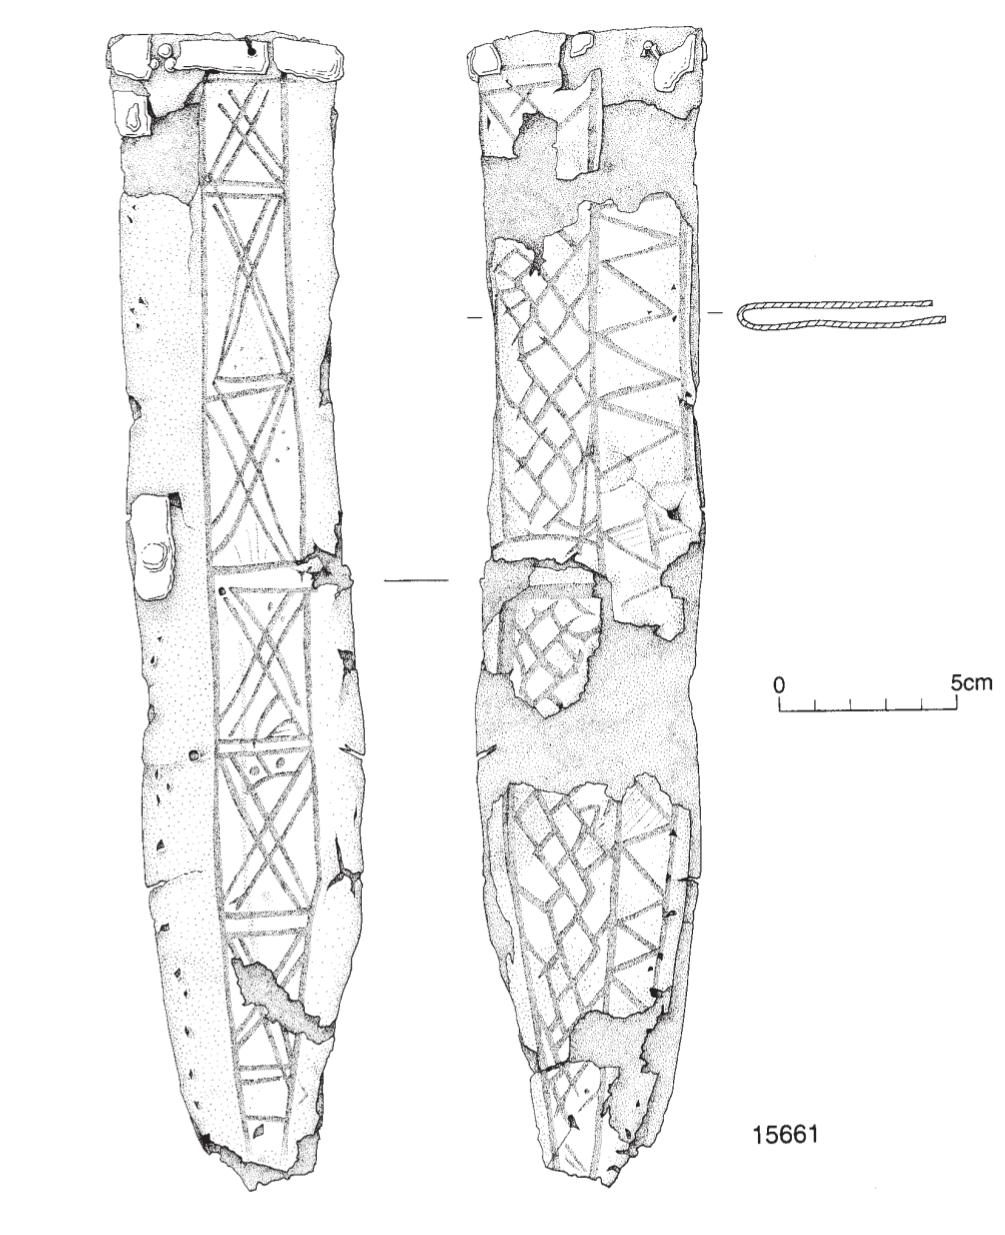
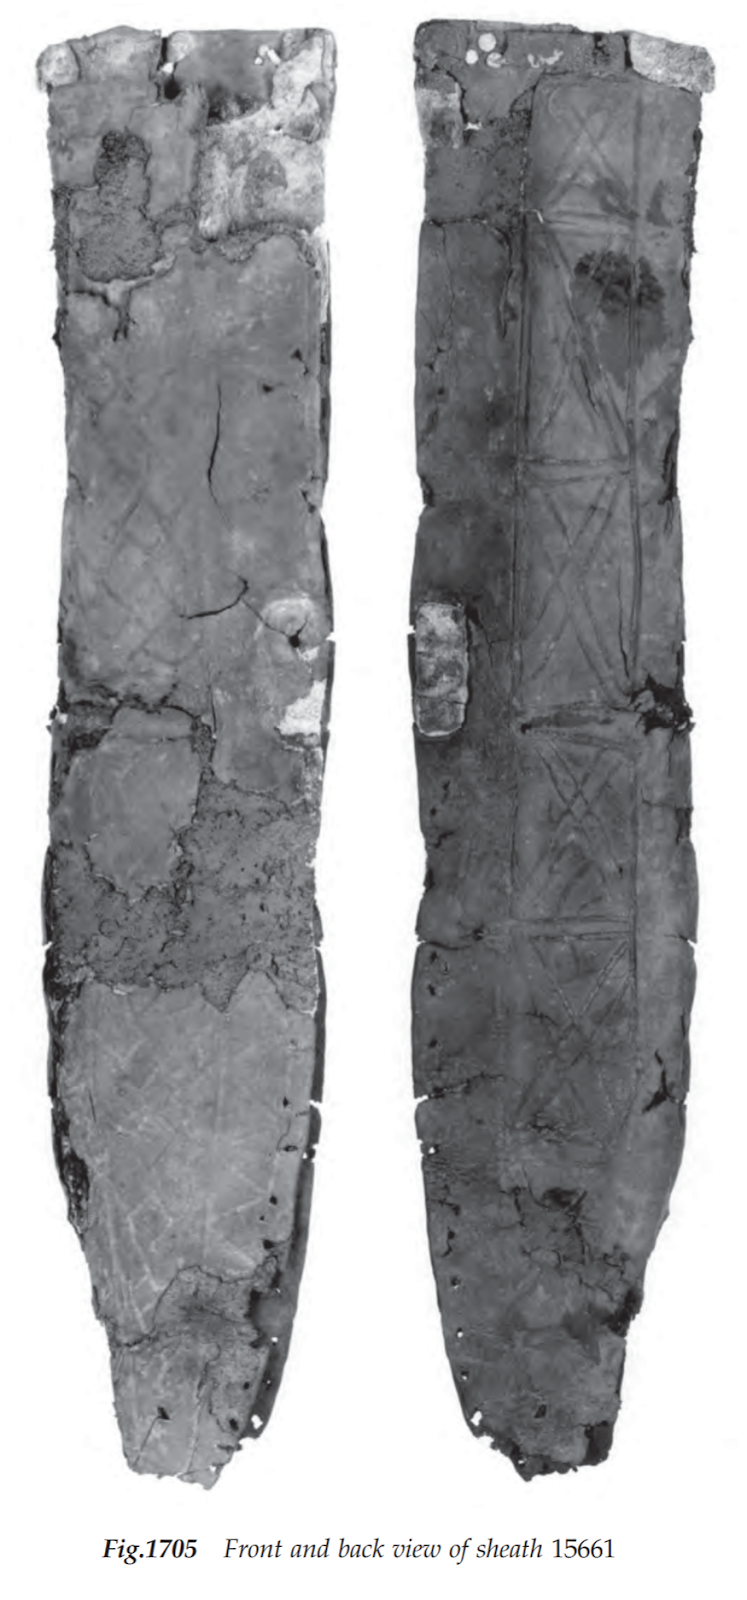
Iron Seax, British Museum. Object 1881,0623.1. Early 10th Century, found near Sittingbourne, in SE England.
Leather and Leatherworking in Anglo-Scandinavian and Medieval York, © 2003, pp 3377-3385
Wednesday, May 30, 2018
On Avoiding Overheating on the List Field
I've
had a bit of 'fun' with overheating, from being raised in colder climes
and fighting in coastal SE Virginia - so, hot and HUMID. Temperatures of 90'f or higher, with humidity of 70-100%, is not unusual for our summers. We had one month in 2017 which was about 110'f and high humidity (at least, that is how I remember it!). Plus my local practices tend to be in the afternoon, in full sun.
So, here's what I do to reduce the chances of overheating:
Conditioning - the better condition you are in, the better your body can deal with the heat.
Hydration - I'm not talking just Gatorade and water. Nuun Tablets work great for me. I eat pickles, and I will sometimes drink the pickle juice. I will also eat salty things and make sure I can taste the salt. If I can't, then my salt is deficient and I need to eat more to correct that.
I start making sure I'm fully hydrated several days before the planned fighting. The morning of the event, I start off drinking the Nuun tablets unless they taste like chalk (if they taste like chalk, it means I don't need the electrolytes.). I also make sure I have plenty of water at hand. My kit now includes the tablets and two water bottles that are marked as mine. They have straws, can be squirted, and the tops lock shut for transport. This is for the events where there is no waterbearing set up, and also just for keeping up with drinking electrolytes.
Here are some other ideas that I have seen:
So, here's what I do to reduce the chances of overheating:
- Linen fight garb, as much as possible. I am trying to only wear cotton when I'm fighting in the cold. For me, that is not more than 40'f. Probably in the 20s and 30s.
- Vent the armpits of shirts, brigs, etc.
- I have put a linen pad (a linen tube stuffed with shredded linen) in my gorget instead of the foam that used to be there and that has helped a lot.
- I changed the arrangement of padding in my helm so that it has air channels in it.
- I use a linen headscarf. The headscarf will often get soaked in cold water & wrung out while I'm wearing it on hot days. I'll also wipe off my face and neck with it, which helps me cool off a bit.
- My armour is a combination of linen and leather, in addition to the metal. My chest armour is linen, my cuisses/thigh armour will likely be made out of linen at the next upgrade.
- I take breaks whenever I need to. It can take months or years to correct the tendency to overheat - IF it can be corrected. I've been told there are no promises on that, but the best way is to not keep overheating.
Conditioning - the better condition you are in, the better your body can deal with the heat.
Hydration - I'm not talking just Gatorade and water. Nuun Tablets work great for me. I eat pickles, and I will sometimes drink the pickle juice. I will also eat salty things and make sure I can taste the salt. If I can't, then my salt is deficient and I need to eat more to correct that.
I start making sure I'm fully hydrated several days before the planned fighting. The morning of the event, I start off drinking the Nuun tablets unless they taste like chalk (if they taste like chalk, it means I don't need the electrolytes.). I also make sure I have plenty of water at hand. My kit now includes the tablets and two water bottles that are marked as mine. They have straws, can be squirted, and the tops lock shut for transport. This is for the events where there is no waterbearing set up, and also just for keeping up with drinking electrolytes.
Here are some other ideas that I have seen:
- Foam padding will retain heat. Use wool or linen instead.
- Use light colors. Simple as it sounds, this can help a lot.
- Some helms have better airflow than others. It's something to look into.
Friday, May 25, 2018
Flax Hair Gel Recipe
Flax gel is the mucilaginous or starchy part of the cooked seed. I have been using this on my hair for years now, and have been very happy with the results.
For a leave-in conditioner, it seems to work best when warm (right after you make it) but can be used every time you shower, even when cold. I use it daily to style my hair, and it works better than the commercial hair gels I’ve used before. It also re-activates if I dampen my hair with a washcloth or damp fingers - which is great at events!
Directions:
2 cups water (4 parts)
1/2 cup flax seed (1 part)
Place in pot in stove over medium-low heat, stirring often. When the white foam starts to appear, turn the heat off. Place a strainer over a bowl that will hold 16 oz or so. Pour the contents into the strainer and let it strain, then stir the remaining seed and scrape the bottom of the strainer to get the last bit of gel. Clean up promptly (the gel will need to be soaked off if it dries, but if you do it right away it comes right off). Keep the gel in closed container - I use a jelly jar. I get 8 to 12 oz of clear gel per recipe.
Also, if you cook it too long, the gel will get too thick to separate from the seeds. It took a few batches for me to get this down but it only takes about 15 minutes to make. The consistency will be about like melted cheese, or egg whites - the picture shows what I mean.
If it is too thick when it has cooled, add water by the spoonful and stir or shake to incorporate it.
I tend to keep mine in the fridge. I've had it last a month in the fridge and up to 3 weeks on the counter. It will start to smell 'off' when it gets old enough, and at that point I throw out what is left.
When camping for the weekend, I bring a 4oz canning jar filled with gel and it is enough for the weekend. I keep it in the cooler. So far, this has worked well, including at Pennsic for just over week.
-Þóra
For a leave-in conditioner, it seems to work best when warm (right after you make it) but can be used every time you shower, even when cold. I use it daily to style my hair, and it works better than the commercial hair gels I’ve used before. It also re-activates if I dampen my hair with a washcloth or damp fingers - which is great at events!
Directions:

|

|

|
2 cups water (4 parts)
1/2 cup flax seed (1 part)
Place in pot in stove over medium-low heat, stirring often. When the white foam starts to appear, turn the heat off. Place a strainer over a bowl that will hold 16 oz or so. Pour the contents into the strainer and let it strain, then stir the remaining seed and scrape the bottom of the strainer to get the last bit of gel. Clean up promptly (the gel will need to be soaked off if it dries, but if you do it right away it comes right off). Keep the gel in closed container - I use a jelly jar. I get 8 to 12 oz of clear gel per recipe.
Also, if you cook it too long, the gel will get too thick to separate from the seeds. It took a few batches for me to get this down but it only takes about 15 minutes to make. The consistency will be about like melted cheese, or egg whites - the picture shows what I mean.
If it is too thick when it has cooled, add water by the spoonful and stir or shake to incorporate it.
I tend to keep mine in the fridge. I've had it last a month in the fridge and up to 3 weeks on the counter. It will start to smell 'off' when it gets old enough, and at that point I throw out what is left.
When camping for the weekend, I bring a 4oz canning jar filled with gel and it is enough for the weekend. I keep it in the cooler. So far, this has worked well, including at Pennsic for just over week.
-Þóra
Monday, May 14, 2018
Resources: Making Armour
Period Patterns 101:
Medieval Military Garments:
Includes 3 gambesons, two with optional pockets for
plates inside the skirt; 4 surcoats (including a cyclas); 3 hose; 1
codpiece, 1 cuisse (thigh protection), a renal belt with pockets for
plates to protect the kidneys, and a swordbelt, in sizes S-XL. verified 5/14/2018
Period Patterns 102: More Medieval Military Garments: Includes patterns for 2 coats of plates, 1 globose-breasted lentner (gambeson), 1 globose-breasted angel-wing tunic (with or without dags on the sleeves), 3 padded coifs and 1 gorget (neck protection). verified 5/14/2018
For fabric, if you will be using linen I suggest using a 7oz or heavier fabric. I've heard that the 5.3oz will wear out in a year or so; when I have used 7.1oz linen, it lasted for 3 years on my brig. Most problems that I had were from holes being rubbed through the fabric, rather than the fabric itself simply wearing out.
Jack of Plate (aka, a brig with the armour sewn instead of riveted) (Wiki link) verified 5/14/2018
Helmet Padding: Military helmet padding. I am not specifically endorsing this; however, I know a lot of folk that use it. verified 5/14/2018
Making Brigandine Leg Armor - Brynn Tannahill, Atlantia. verified 5/14/2018
Modar University, Armour page. Barony of Forgotten Sea of Calontir. verified 5/14/2018
Their new 'Articles & How-To' page is here. They have gobs of information - Archery, A&S, Cooking, and more. Looks like the armouring articles may be different as well, so check both.
MIA/Verify: Building your Own Armour, and other articles; via The Principality of Insulae Draconis.
Youth Combat: by Arianna of Wynthrope, OL, OP, Kingdom of AEthelmaerc. Please note, this has not been updated since 2014 - so please check the information against the current rules! The author has over 10 years experience with youth fighters, and the site has information on making both weapons and armour. verified 5/14/2018
Note: Links to stores below are to the main page, not the specific item.
Shield Edging: PVC, low profile, aka 'Trim-Loc' and 'the stuff they use on car doors' (Yes, I have heard it called that). Available at Windrose Armoury; Munitions Grade Arms; McMaster Carr
SS Slimline Basket hilt, 1.5#s, Windrose Armoury.
Leather sources:
Springfield Leather: Family owned and operated leather supply store located in the USA. They do carry sole leather, which is armour weight. They also sell tools, beads, hand-painted feathers, exotic leathers... Their catalog is pa ked full, and half an inch thick. I have ordered from them, and the customer service was excellent.
Brettun Leather: Leather supply store based in Maine. From their website : "We buy our leather and other products from leather goods manufacturers and tanneries throughout New England and around the world, and help them reduce excess inventory. We also help them avoid sending good leather to the landfill. The end result is that we are able to offer high quality leather and craft items to you at low prices." They also offer free shipping to the contiguous 48 states, and do their best to offer it to customers in Alaska, Hawaii, and the Territories. They also sell supplies to restore and repair steamer trunks, and have information on restoring them as well.
Period Patterns 102: More Medieval Military Garments: Includes patterns for 2 coats of plates, 1 globose-breasted lentner (gambeson), 1 globose-breasted angel-wing tunic (with or without dags on the sleeves), 3 padded coifs and 1 gorget (neck protection). verified 5/14/2018
For fabric, if you will be using linen I suggest using a 7oz or heavier fabric. I've heard that the 5.3oz will wear out in a year or so; when I have used 7.1oz linen, it lasted for 3 years on my brig. Most problems that I had were from holes being rubbed through the fabric, rather than the fabric itself simply wearing out.
Jack of Plate (aka, a brig with the armour sewn instead of riveted) (Wiki link) verified 5/14/2018
Helmet Padding: Military helmet padding. I am not specifically endorsing this; however, I know a lot of folk that use it. verified 5/14/2018
Making Brigandine Leg Armor - Brynn Tannahill, Atlantia. verified 5/14/2018
Modar University, Armour page. Barony of Forgotten Sea of Calontir. verified 5/14/2018
Their new 'Articles & How-To' page is here. They have gobs of information - Archery, A&S, Cooking, and more. Looks like the armouring articles may be different as well, so check both.
MIA/Verify: Building your Own Armour, and other articles; via The Principality of Insulae Draconis.
Youth Combat: by Arianna of Wynthrope, OL, OP, Kingdom of AEthelmaerc. Please note, this has not been updated since 2014 - so please check the information against the current rules! The author has over 10 years experience with youth fighters, and the site has information on making both weapons and armour. verified 5/14/2018
Note: Links to stores below are to the main page, not the specific item.
Shield Edging: PVC, low profile, aka 'Trim-Loc' and 'the stuff they use on car doors' (Yes, I have heard it called that). Available at Windrose Armoury; Munitions Grade Arms; McMaster Carr
SS Slimline Basket hilt, 1.5#s, Windrose Armoury.
Leather sources:
Springfield Leather: Family owned and operated leather supply store located in the USA. They do carry sole leather, which is armour weight. They also sell tools, beads, hand-painted feathers, exotic leathers... Their catalog is pa ked full, and half an inch thick. I have ordered from them, and the customer service was excellent.
Brettun Leather: Leather supply store based in Maine. From their website : "We buy our leather and other products from leather goods manufacturers and tanneries throughout New England and around the world, and help them reduce excess inventory. We also help them avoid sending good leather to the landfill. The end result is that we are able to offer high quality leather and craft items to you at low prices." They also offer free shipping to the contiguous 48 states, and do their best to offer it to customers in Alaska, Hawaii, and the Territories. They also sell supplies to restore and repair steamer trunks, and have information on restoring them as well.
Tuesday, February 27, 2018
Adjustable C-belt Pattern
This is a pattern created from the belt I have been fighting in for the last 4 years. The pattern for it came from a friend who had moved here in from the East Kingdom. It has been flexible for sizing and comfortable. It has fit me from a jeans size 9 through 16, by relacing the back. Relacing does not seem to have affected how the cuisses are hung.
You can add thin (¼"-⅛") padding inside the leather if desired, just leave about 1" of leather around the padding.
ETA: For the center back (pg 5 on the PDF), you may need a slightly different shape. I helped a friend make this from the pattern and we found out that her center back needs to be slanted on the sides, and the top & bottom were fine as-is.
What we did to get the new shape was to cut out the two side pieces and put the lacing holes in each. We ran a lace through the top hole of each one, and another lace through the bottom hole. This had the effect of holding each side even.
She held the two sides in place on her as I stood behind her with the laces. Correct placement of the side pieces is important - the center of the side piece should be in line with the side seam of your pants.
I pulled the laces until the sides were lined up correctly and then tied the laces taunt to hold them there. We took the belt off of her, laid it down on paper with the laces tight between the sides, and used that to draw a pattern for the center back for her. Remember to include the overlap with the sides when you do this!
I welcome any suggestions or comments about the pattern & belt. I am always looking to improve it.
C-belt Pattern
You can add thin (¼"-⅛") padding inside the leather if desired, just leave about 1" of leather around the padding.
ETA: For the center back (pg 5 on the PDF), you may need a slightly different shape. I helped a friend make this from the pattern and we found out that her center back needs to be slanted on the sides, and the top & bottom were fine as-is.
What we did to get the new shape was to cut out the two side pieces and put the lacing holes in each. We ran a lace through the top hole of each one, and another lace through the bottom hole. This had the effect of holding each side even.
She held the two sides in place on her as I stood behind her with the laces. Correct placement of the side pieces is important - the center of the side piece should be in line with the side seam of your pants.
I pulled the laces until the sides were lined up correctly and then tied the laces taunt to hold them there. We took the belt off of her, laid it down on paper with the laces tight between the sides, and used that to draw a pattern for the center back for her. Remember to include the overlap with the sides when you do this!
I welcome any suggestions or comments about the pattern & belt. I am always looking to improve it.
C-belt Pattern
Monday, March 6, 2017
Leatherwork - An Axe Cover for my Knight
Project: Brandarm Axe Cover
Artisan: Lady Þóra (Thóra) Hrafnsdóttir
Historical Basis:
None. This is a non-period project, as I was recreating an existing cover for this axe. The heraldry used was matched to Sir Harald's heraldry of wolf and lion. The tooling techniques used were learned many years ago in a shop class.

Tools used:
Paper patterns, utility knife, leather hole punch, leather stylus and bevellers, contact cement. Finished with waxed linen thread, craft paint, satin leather finish (sealant).

Procedure:
The overall pattern was copied from the existing cover. The leather was cut out with a utility knife, and then tooled. I created patterns for the heraldry from Sir Harald’s device. These were then traced onto the leather with the stylus, then used the mallet and tooling implements to impress the design into the leather without cutting it.
After tooling, the leather was painted and then the paint was sealed. Two layers of paint were used for better coverage. The leather was stitched together with waxed linen thread using a blanket stitch, and the buckle and strap were prepared and attached.
After stitching, a piece of thicker leather was water hardened and shaped to the blade. When dry, it was glued into the cover, along the seam where the blade rests, using contact cement. It was held in place by the axe while the glue set.


Artisan: Lady Þóra (Thóra) Hrafnsdóttir
Historical Basis:
None. This is a non-period project, as I was recreating an existing cover for this axe. The heraldry used was matched to Sir Harald's heraldry of wolf and lion. The tooling techniques used were learned many years ago in a shop class.

Panels for new cover in front, old cover in background
Tools used:
Paper patterns, utility knife, leather hole punch, leather stylus and bevellers, contact cement. Finished with waxed linen thread, craft paint, satin leather finish (sealant).

Leather stylus (far left) and bevellers
The overall pattern was copied from the existing cover. The leather was cut out with a utility knife, and then tooled. I created patterns for the heraldry from Sir Harald’s device. These were then traced onto the leather with the stylus, then used the mallet and tooling implements to impress the design into the leather without cutting it.
After tooling, the leather was painted and then the paint was sealed. Two layers of paint were used for better coverage. The leather was stitched together with waxed linen thread using a blanket stitch, and the buckle and strap were prepared and attached.
After stitching, a piece of thicker leather was water hardened and shaped to the blade. When dry, it was glued into the cover, along the seam where the blade rests, using contact cement. It was held in place by the axe while the glue set.

Tooling in progress. The dark areas are where the leather is dampened for tooling.

Wolf, painted and tooled.

Blanket stitching

Sir Harad with the axe and cover at Battle on the Bay

Axe Cover and documentation, as entered at 'Best Viking Bling' Arts and Sciences competition. Spring Coronation, April 2016, Atlantia (Winning Entry)

Harald’s device
Conclusion:
I have learned a lot from this project. I asked for and received feedback from several leatherworkers on how to improve the cover, should I make another one. They have given me a lot to think about, and avenues for further exploration. I do enjoy working with leather and will be doing more of this.
Wednesday, January 4, 2017
Notes: Lightweight Brigandine
I've been wearing my brigandine for just over a year now. I've had to take out rivets, remove a couple plates, add other plates, reattach straps, and wash it.
I have learned that:
I have learned that:
- The brigandine is light enough that a blow can brush it nicely out of the way. I learned very quickly to put it on underneath my C-belt, so that it was prevented from moving like that. Doing so also meant I was able to remove the bottom pair of chest plates on the front, as they were now under the belt and it made armouring up more difficult - definitely not something I wanted.
- The spine plates flip up seemingly every time I put it on. This is annoying and needs to be designed out of the next one. On this one, I should be able to drill holes in the lower corners and sew (not rivet) them to the fabric, with the stitches going out to the side so they can still crush down.
- Taking out rivets is a lovely way to rip holes in the linen. I'm sure drilling them out contributes, but that's how I was able to get them out.
- The straps need to be level and on top of the chest plates; this helps prevent them from warping the rivets.
- If using dyed leather for the straps, be aware it will bleed when water is applied (from sweating in it, or from attempting to wash out said sweat).
- Since this one doesn't wash well (see above) I have been generous with fresh air, Febreeze, and sunlight. It seems to be working, as it doesn't smell.
- On the next one I need to make sure I shape the chest plates. I didn't do it on this one, and I do think it would look better if I had.
I do plan on making another one and applying what I have learned here. Overall, I am quite happy with it.
Tuesday, July 19, 2016
Heraldic Resources
I can never recall the fancy words the heralds use in their descriptives. The sites below use at least mostly plain English, and I have found them helpful. They are here partly because I don't want to lose the links!
SCA Heraldry Wiki - This links to the Pennsic Traceable Art page, but the entire site is useful.
SCA College of Arms
Wiki: Attitude: Heraldry - good, simple, illustrated 'this is how they are standing' page.
Pictorial Dictionary of Heraldry - basic information and drawings. Good to start with, and a VERY helpful site overall for me.
SCA Armorial Search page - covers the Knowne World. All words, no pictures. Know your herald-ese or have translations handy =)
A Complete Guide To Heraldry - by Arthur Charles Fox-Davies, in Edinburgh, 1909. Now in public domain. Has the illustrations, too.
SCA Heraldry Wiki - This links to the Pennsic Traceable Art page, but the entire site is useful.
SCA College of Arms
Wiki: Attitude: Heraldry - good, simple, illustrated 'this is how they are standing' page.
Pictorial Dictionary of Heraldry - basic information and drawings. Good to start with, and a VERY helpful site overall for me.
SCA Armorial Search page - covers the Knowne World. All words, no pictures. Know your herald-ese or have translations handy =)
A Complete Guide To Heraldry - by Arthur Charles Fox-Davies, in Edinburgh, 1909. Now in public domain. Has the illustrations, too.
Wednesday, March 2, 2016
Lightweight Brigadine
I needed to replace the brigadine I was using, as it is loaner gear for my barony. I was pretty happy with how it worked for me, so I decided to copy it and add the adjustments I wanted to make.
I wanted to be able to buckle myself - nearly impossible when it buckles in the back, which the original one did. I also wanted it to be lighter and more fitted to me.
I stretch out in my armour. That's how I check f I can do that, and not sacrifice protection, I should be OK on the field. Plus I can warm up easily, in full kit, if I need to. The original brig allowed for this, and that was one of the things I liked. It also adjusted as I slimmed down from the fighting and my fitness increased.
For the fabric pattern, I used the Period Patterns #101.I believe they called it a 'surcoat with optional pockets for plates, optional sleeves.'
Plates: You will need:


You will want to curve the flanks and chest/belly plates slightly, to conform to your body.
Cut out the plates. Round the edges to make them less likely to cut you or your fabrics. You can use sandpaper, a power tool of some kind, or even a utility knife. Just be careful, with any of them. Then wipe them off to remove any dust.
Then drill holes for the rivets:
Riveting:
This is how I put the rivets together:
-Chest plates (top front row) overlap so that they crush forwards, as if you were crossing your arms.
-Belly plates crush downwards, so you can bend over easily. Spine plates do the same.
-Flank plates crush towards the chest/belly.
Notes:
-You should have spine plates from the top down to your pants waist.
-Chest/ belly plates should also go down to your pants waist. They start lower to allow room for neck movement. That space should be covered by your gorget.
-There shouldn't be much (if any) room between flank and spine pieces when you're wearing it. There is room between mine, but not after I strap it on & add my tabard & belt.
-The chest/belly pieces should meet when the brig is buckled on. On the brig that I patterned from, they are solid pieces & the brig buckled in the back. I cut them in half in order to allow for buckling the brig in the front.
-Don't forget to shape the chest and belly pieces to fit you somewhat. It can make a big difference.
Straps: I used leather, and they seem to work best when the rivets are 3/4" (on center) below the plate rivets, two per strap on each side. The one place I didn't do that, I could see a difference in just a couple of weeks.
Sweat will cause the leather dye to transfer also, so I'd suggest light leather & maybe a pale brown or cream type color of fabric. IOW try to match them a bit so the transfer isn't too obvious!
I wanted to be able to buckle myself - nearly impossible when it buckles in the back, which the original one did. I also wanted it to be lighter and more fitted to me.
I stretch out in my armour. That's how I check f I can do that, and not sacrifice protection, I should be OK on the field. Plus I can warm up easily, in full kit, if I need to. The original brig allowed for this, and that was one of the things I liked. It also adjusted as I slimmed down from the fighting and my fitness increased.
For the fabric pattern, I used the Period Patterns #101.I believe they called it a 'surcoat with optional pockets for plates, optional sleeves.'
Plates: You will need:
- Spine: 8 plates (maybe more), 3" square
- Chest: center top: 4 plates, 6" tall & 3" wide
- Flanks: (your sides): 6 plates, 3" wide & 8" tall.
- Belly: 8 plates, 3.5" tall & 8" wide. Four of them should be cut curved at the edges. Two curved for the top, two curved for the bottom (see below). The circles indicate rivet locations:


You will want to curve the flanks and chest/belly plates slightly, to conform to your body.
Cut out the plates. Round the edges to make them less likely to cut you or your fabrics. You can use sandpaper, a power tool of some kind, or even a utility knife. Just be careful, with any of them. Then wipe them off to remove any dust.
Then drill holes for the rivets:
- Spine: one hole at each top corner
- Chest: on the outside long edge, drill one hole in the top corner and another 2" below it. For the two center pieces, drill one more in the top corner.
- Belly: Drill 4 holes, equally spaced, along the top edge.
- Flanks: Drill 3 holes along the long edge, towards the back (the side away from the chest plates). Drill a second matching row about 1" in.
Riveting:
This is how I put the rivets together:
- Push the post side through the plate, then add a washer.
- Then push the post through the linen, *between the fibers.* That's not as hard as it sounds and is better for durability.
- Add another washer.
- Put the rivet cap or washer on and set it.
-Chest plates (top front row) overlap so that they crush forwards, as if you were crossing your arms.
-Belly plates crush downwards, so you can bend over easily. Spine plates do the same.
-Flank plates crush towards the chest/belly.
Notes:
-You should have spine plates from the top down to your pants waist.
-Chest/ belly plates should also go down to your pants waist. They start lower to allow room for neck movement. That space should be covered by your gorget.
-There shouldn't be much (if any) room between flank and spine pieces when you're wearing it. There is room between mine, but not after I strap it on & add my tabard & belt.
-The chest/belly pieces should meet when the brig is buckled on. On the brig that I patterned from, they are solid pieces & the brig buckled in the back. I cut them in half in order to allow for buckling the brig in the front.
-Don't forget to shape the chest and belly pieces to fit you somewhat. It can make a big difference.
Straps: I used leather, and they seem to work best when the rivets are 3/4" (on center) below the plate rivets, two per strap on each side. The one place I didn't do that, I could see a difference in just a couple of weeks.
Sweat will cause the leather dye to transfer also, so I'd suggest light leather & maybe a pale brown or cream type color of fabric. IOW try to match them a bit so the transfer isn't too obvious!
Tuesday, October 20, 2015
Viking Clothing Resources
Still a work in progress; I will be adding more information as I gather it.
Overviews:
Simple Viking Clothing for Men (pdf)
Simple Viking Clothing for Women (pdf)
Both of the above are from http://thorsonandsvava.sccspirit.com, an SCA website for Royalty of the East (2004).
Wychwood Kit Resources - Resource page by the Wychwood Warriors (aka the Oxford University Historical Reenactment Society). Resources for male and female garb, bling, wallets, armour, etc.
Recreating Viking Clothing
The Viking Answer Lady - SCAdian, a great resource for most anything Viking.
Recreating Viking Clothing, by Hilde Thunem: Great site, as much for research as patterns.
Pants:
Overviews:
Viking Men: Clothing the Legs
Thorsberg: dated 100-300 BCE
Rus: tba
Shirts:
Overview: Viking Tunic Construction, by Þóra Sharptooth. Includes information on jackets and trims also.
Thorsberg: tba
Other one: tba
Head wear:
'Coifs': I use headscarves, rather than coifs as are found in later periods. A simple square of cloth, long enough to tie around my head and hang down far enough to cover my hair (helps keep it clean at dusty events!)
Skjoldehamn hood: A Tunic and Hood from Skjold Harbour
Dyes:
Viking Age Dyes, a Brief Overview (academia.edu)
Apron Dress:
Vidgis' Apron Pattern - Easy to fit to your measurements. I believe the straps in the finds are usually 1/2" wide, so you can use straps half the width that she calls for.
Sark (Underdress):
Honestly, I use this: Elizabethan Smock Pattern Generator. I sew the neck in first, and modify the outline to fit Viking finds. I modify the underarm gussets as needed, which varies for each person.
Ladies Coat:
The Red Jacket
Jewelry: tba
Weapons: tba
Shoes: tba
Overviews:
Simple Viking Clothing for Men (pdf)
Simple Viking Clothing for Women (pdf)
Both of the above are from http://thorsonandsvava.sccspirit.com, an SCA website for Royalty of the East (2004).
Wychwood Kit Resources - Resource page by the Wychwood Warriors (aka the Oxford University Historical Reenactment Society). Resources for male and female garb, bling, wallets, armour, etc.
Recreating Viking Clothing
The Viking Answer Lady - SCAdian, a great resource for most anything Viking.
Recreating Viking Clothing, by Hilde Thunem: Great site, as much for research as patterns.
Pants:
Overviews:
Viking Men: Clothing the Legs
Thorsberg: dated 100-300 BCE
Rus: tba
Shirts:
Overview: Viking Tunic Construction, by Þóra Sharptooth. Includes information on jackets and trims also.
Thorsberg: tba
Other one: tba
Head wear:
'Coifs': I use headscarves, rather than coifs as are found in later periods. A simple square of cloth, long enough to tie around my head and hang down far enough to cover my hair (helps keep it clean at dusty events!)
Skjoldehamn hood: A Tunic and Hood from Skjold Harbour
Dyes:
Viking Age Dyes, a Brief Overview (academia.edu)
Apron Dress:
Vidgis' Apron Pattern - Easy to fit to your measurements. I believe the straps in the finds are usually 1/2" wide, so you can use straps half the width that she calls for.
Sark (Underdress):
Honestly, I use this: Elizabethan Smock Pattern Generator. I sew the neck in first, and modify the outline to fit Viking finds. I modify the underarm gussets as needed, which varies for each person.
Ladies Coat:
The Red Jacket
Jewelry: tba
Weapons: tba
Shoes: tba
Monday, July 6, 2015
My SCA Timeline
I usually attend two events a month, on average, and often help with clean up & teardown. Below are highlights. To see a more complete list of my work and creations in the SCA, please go to the Atlantian Wiki.
February:
January: Ice Castles Barony of Black Diamond, Atlantia
April:
March:
February:
September: Rip Rap War.
March: Tir-y-Don Baronial Birthday:
September: Bacon Wars: A Haus Divided:
March: Tir-y-Don Baronial Birthday:
For anyone interested, here is a link to the full Atlantian Order of Precedence, with information on awards & recipients.
~~ 2019 ~~
June: University #101, Barony of Black Diamond:- Taught Leathercare 101 (first time teaching)
February:
- Relocated to Barony of Black Diamond
January: Ice Castles Barony of Black Diamond, Atlantia
- A&S: Open display of Anglo-Saxon Seax Sheath.
- A&S: Competed my first scroll. Entered it into, and won, ‘Best Scroll Border’ competition. Scroll: Staffordshire Hoard Seax Scroll
~~ 2018 ~~
April:
- Martial: Started a Facebook group for Youth Combat in Tir-y-don and Marinus. As I was marshaling for two baronies, this seemed the easiest way to coordinate practices.
March:
- Martial: Officially became Youth Armored Combat Marshal for Tir-y-don.&
February:
- Martial: Started organizing Youth Armored Combat practices in Tir-y-don.
~~ 2017 ~~
October: War of the Wings:- Martial: Completed Marshal training for both Youth and Adult Heavy Combat.
September: Rip Rap War.
- Service: Inducted into the Atlantian Order of the Opal (AoA-level service award).
- Service: Stepped down as Seneschal of Tir-y-don at the monthly business meeting.
~~ 2016 ~~
March: Kingdom Arts & Sciences:- A&S: Displayed Viking Coat - a modern trench coat (‘suede’ with wool pelt lining) being modified onto a Viking caftan.
~~ 2015 ~~
March: Tir-y-Don Baronial Birthday & 40th Anniversary.- Martial: Inducted into the Atlantian Order of the Osprey (AoA-level fighting award)
- Service: Inducted into the Baronial Order of the Swan and Cygnet (service award).&
- Service: Stepped up as Seneschal for Tir-y-Don.
~~ 2014 ~~
April: Spring Coronation:- Squired to Sir Harald Brandarm of Dun Carraig, Atlantia.
March: Tir-y-Don Baronial Birthday:
- Martial: Inducted into the Baronial Order of the Orca (fighting award for prowess & chivalry)
~~ 2013 ~~
October: Fall Coronation:- Received my Award of Arms.
September: Bacon Wars: A Haus Divided:
- A&S: Displayed Jewelry Box. Modern materials, period-based artwork on outside, with documentation.
March: Tir-y-Don Baronial Birthday:
- Martial: Authorized as a heavy fighter.
- A&S: Entered and won (to my complete shock) the A&S competition, for food. I made carrageen pudding, with documentation. Delicious, easy, and fairly quick to make.
~~ 2012 ~~
March: Tir-y-Don Baronial Birthday:- Attended first event as guest. I've been told I couldn't have been more distracted if I tried - and no, there weren't even any horses there =)
For anyone interested, here is a link to the full Atlantian Order of Precedence, with information on awards & recipients.
An Introduction ~
I am Þóra Hrafnsdottir, also known as Thóra the Tall, of the Barony of Black Diamond, Atlantia. I am a heavy fighter, I do Arts & Sciences, and make most of my armor and garb.
I am squired to Harald Brandarm of Dun Carraig, Atlantia.
The title of the blog comes from my original heraldry, which is now registered as my badge: Argent, five swords in annulo, points to center sable within an annulet gules. I describe it as 'five swords within a red ribbon pierced with five needles'. The swords for my fighting, the needles for my fiber arts, and the ribbon for the blood of life.
My current device was submitted in the winter of 2016, and I kept one sword, one needle, and the red ribbon from the heraldry that I originally submitted. This was registered in February of 2017: Argent, a raven rising perched upon and maintaining a sword fesswise sable, on a chief gules a needle argent.
The red is for family (both blood and chosen family), the needle is pointed at my family (to the right as you look at it) to show that I take care of them. The raven is messenger to the gods, and the sword is pointed to the left as you look at it. When I hold my shield on the field of combat, it is pointed at those who may threaten the ones I can about. (To clarify - I am not threatening harm to anyone here; I am expressing the
My Arts & Sciences:
I am squired to Harald Brandarm of Dun Carraig, Atlantia.
The title of the blog comes from my original heraldry, which is now registered as my badge: Argent, five swords in annulo, points to center sable within an annulet gules. I describe it as 'five swords within a red ribbon pierced with five needles'. The swords for my fighting, the needles for my fiber arts, and the ribbon for the blood of life.
My current device was submitted in the winter of 2016, and I kept one sword, one needle, and the red ribbon from the heraldry that I originally submitted. This was registered in February of 2017: Argent, a raven rising perched upon and maintaining a sword fesswise sable, on a chief gules a needle argent.
I took the elements of the original submission, added a raven, and redesigned it. The red ribbon is now a chief (a bar across the top), with the needle laying across it. The raven is holding a sword in it's claws, wings held aloft for the first downstroke as it takes flight.
The red is for family (both blood and chosen family), the needle is pointed at my family (to the right as you look at it) to show that I take care of them. The raven is messenger to the gods, and the sword is pointed to the left as you look at it. When I hold my shield on the field of combat, it is pointed at those who may threaten the ones I can about. (To clarify - I am not threatening harm to anyone here; I am expressing the
My Arts & Sciences:
- Leather: tooling, making armor and other items, as well as leather care and restoration.
- Wool: Shearing, preparation, and spinning
- Gardening: I grow herbs, flowers, and some food and dye plants
- Embroidery: crewel work, regular embroidery, and modern cross-stitch
- Sewing
- Tablet Weaving
Originally posted July 2015; updated April 2025
Subscribe to:
Posts (Atom)